If you changed your Office password or logged with multiple Office accounts in the system. You may face this.
Even though you hit on “Login Now”, it comes to same screen. No Options! You not allowing to sign in or not allowing you to do anything other than hitting on login.
You could try kill the app (in “task manager”) but still its same.
Until Microsoft finds proper way to handle this dead lock, you could try below solution.
Right click on Microsoft teams task manager icon and hit on ‘Log out’ then login again.
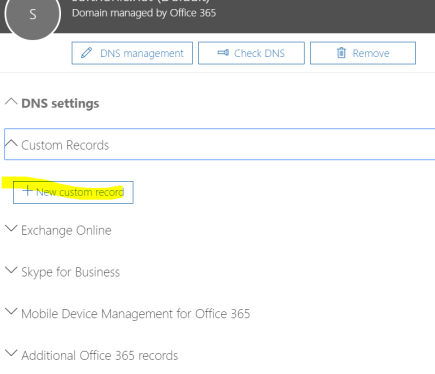
If you are setting up Office 365 with custom domain you will be asked to configure name server pointing to below in the domain admin page. In our case it will be Google domains registration page.
If you altered name servers into Office 365 it wont help you to propagate DNS entries with Google domain management tool since you have handed over responsibilities to Microsoft Online DNS services.
⚡ Note – You required to enter DNS record in Office 365 but not in the google domain registration console.
You could achieve adding custom domain entries buy following path or finding domains in search in Office 365 admin portal.
☛ Home –> Setup –> Domains –> New Custom Record
⌛ It may take many minutes to propagate around the world based on the condition and you could check success of propagation with tool ViewDNS.
Common trend we came and interesting figure we came up is moving towards Severless where we are not worry about infrastructure. “Azure Functions” is a compute offering which you allow to write custom logic with choice of C#, F# and JavaScript (as for May, 2017).
From the choices above I have chosen SharePoint CSOM (Client Side Object Model) to this sample but if you prefer JSOM or REST API with the requirement, you could go with those.
Lets checkout Azure Functions with SharePoint Online where both in same cloud group which call as SaaS (Software as a Service).
🛠 Step ♳ – Create an Azure Function
You could arrive there with simply following below reference which is common thing and described in every reference.
After you arrived with Kudu portal, check for debug then PowerShell (Command prompt is also available but prefer PS). Navigate to bin folder which resides under following location under you function name and upload your SharePoint DLLs to the folder (i.e. Microsoft.SharePoint.Client.dll and Microsoft.SharePoint.Client.Runtime.dll)
🛠 Step ♵ – Refer SharePoint references on the Function
After adding DLLs to the bin, you could arrive with function and start writing you logic within the run.csx.
You could refer added DLLs in the function as below in the top.
#r “Microsoft.SharePoint.Client.Runtime.dll”
#r “Microsoft.SharePoint.Client.dll”
🛠 Step ♶ – Imports references
This is typical step we are doing in any C# which is adding references.
using System;
using System.Security;
using System.Configuration;
using Microsoft.SharePoint.Client;
🛠 Step ♷ – Configuration Values in Azure Function
You will be required the user name, password, and site URL to your SharePoint, those could be done with the application settings as we were keep doing with the web.config files.
Navigate thorough below path and add your configurations where you will be references in function logic.
Click on Function à Platform Features à Application Settings à App settings à Add values as key/ value pairs
You could write as your preference. In my sample on the gist which I have posted below is considered copying list items from one list to another. It’s really simple and you could able to expand the logic as you have done earlier with SharePoint CSOM.
This file contains bidirectional Unicode text that may be interpreted or compiled differently than what appears below. To review, open the file in an editor that reveals hidden Unicode characters. Learn more about bidirectional Unicode characters
In SharePoint online environment most of the businesses facing issue with connecting with another business (B2B) or in technical terms connecting with another domain.
We have been using different methods with the Active Directly level which we known as “Federation”. But will see how we could share SharePoint site with multiple domains.
📓 Note :
You must have either Microsoft account or organizational account to achieve this.
Microsoft account must not be Live, Outlook or Hotmail, It could be Gmail, Yahoo or another. Then you should create a Microsoft account with your domain. Eg. “example@yahoo.com”.
Organizational account is account in another Office 365 tenant
How to share site with external domain user?
Firstly, you must enable External Sharing in the Office 365 admin center. This could be find easily with searching external sharing in the admin center.
Second, Go site administration and select your SharePoint site and hit on “Share” on the ribbon. Make sure and best practice 🔖 to mention your external domain you sharing as below.
Finally added user will be visible as below in the Office 365 admin center.
Registration of custom bot with the Bot directory is a simple process which can achieved by following through the link Register new bot.
Even it is simple there are few tips you can find out and something new to notice which describes as below.
Bot Handle?
This will be the wording which will used to create bot end point with your bot application. If I use bot handle as “TechCentro” generated embeded URi will be “https://webchat.botframework.com/embed/TechCentro”. This could contain only alphanumeric characters and underscore only.
Messaging end point?
After you hosted your bot application you will exposed the URL of messaging endpoint, or in simple terms it will be route URL to your bot.
If you go with bot framework “Bot Application” template, it will be URL of web app plus “/api/messages”.
Note: You must need to configured HTTPS and HTTP wont help you to proceed in the process.
Microsoft App ID?
This will generate by the bot registration application for you. You just need to tap on “Create Microsoft App ID and Password” then you will be redirected to App ID and password generation site.
Generated password will important keep in backup in a secure place since you wont be able to get it in future after your bot is created.
Since this is quick update on the Microsoft Office team and no influence on the functionality aspect, thought of make post ultra summarized. Older Office365 started rolling out in December and will continue through early 2017. Quick view will be enhanced in the home page of yours login as below.
There is a change on your apps on the cloud but more or less this is a UX (user experience) side improvements which makes Office user happy.
You can create new documents and also view latest modified documents at a glance on the home page. Documents will be simply quick preview of your OneDrive.
Your start page as can be selected on your preference with tapping on the “Settings Gear” which appears on the top right corner.